Tag Archives: idea

Home Made Tortilla Chips

Standard


Well after I picked the kids up from school today I asked them what they wanted for dinner and surprisingly they both said tacos, I was a little unsure at first because our taco night has gotten kind of bland so I thought of what else I could make with it to make it a little more interesting! I figured home made tortilla chips and salsa would be wonderful!

I found this recipe on about.com so I figure I would share! Cheap, easy, and delicious!

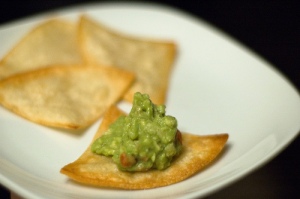
Crunchy and crispy these are excellent companions for your favorite salsa or guacamole.


Prep Time: 1 minute

Cook Time: 5 minutes

Total Time: 6 minutes

Ingredients:

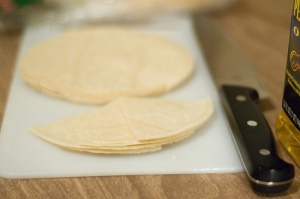
  • 12 corn tortillas cut into 6-8 wedges
  • oil for frying
  • salt to taste

Preparation:

This recipe is a great reason to get out your deep fryer, but if you don’t have one, use about 3/4 cup of oil in a medium frying pan. If you use a deep fryer, follow the manufacturers instructions.For pan frying- 
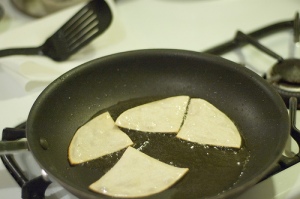
Heat oil over medium-high heat for about a minute. Drop a crumb of tortilla into the oil, if it sinks, it’s not hot enough. If it bubbles and comes to the top, it’s perfect.

Slide pieces into oil using a slotted spoon or spatula just a few at a time. Let pieces fry until golden brown and crispy, less than one minute. Drain on paper towels and sprinkle with salt. Serve immediately or store in a tightly covered container.

Great Loaded Potato Skins!

Standard
Loaded Potato Skins with cheese and bacon
  • 6 small to medium sized russet potatoes, rinsed clean
  • 8 oz of sharp cheddar cheese, shredded
  • 8 slices of smoked, thick cut bacon, cooked and crumbled
  • 1/2 stick of unsalted butter
  • 6 tbsp sour cream, optional
  • 2 tbsp of chopped chives, optional
  • Salt to taste
  • Pepper to taste

Begin by preheating your oven to 400 degrees. Poke the top of each potato with a fork and place on a baking sheet. Cook in the oven for 1 hour. Once cooked, remove from the baking sheet, and place on a plate to let cool for about 15 minutes.

In the meantime, if you are a fan of sour cream, which I am, add the sour cream to a small bowl, toss in half of the chives, mix, and let this sit in the refrigerator until ready to serve.

Cook your bacon, low and slow on the stove, for about 15-20 minutes. The low and slow process, in my opinion, is the only way to cook bacon as it really yields perfect bacon every time. Remove the bacon and let any additional fat drain on some paper towel, before you crumble it down.

Once your potatoes are cooled, use a sharp bread knife and you will cut lengthwise, into three segments of one potato, long slices. So each potato will yield two skins, right? Discard the middle slice and reuse for breakfast the following morning, or heck for that matter, add some butter, salt, and cream, and make some rustic mashed potatoes.

Continue this cutting process with the rest of the potatoes. You should then have 12 skins. With a small spoon, being careful, scoop out about 70 percent of the potato, as you still want some potato in your boat.

Next, melt your butter in the microwave. Get your broiler heated to high. Brush the butter on the inside and outside of each potato skin and place them back onto the baking sheet. Season the inside of each skin with salt and pepper.

Place them under the broiler for 8-10 minutes until the insides get a bit crispy from the melted butter. Remove, and place generous amounts of cheddar cheese into each skin, topping with bacon pieces. Place these back under the broiler for about 3-4 minutes until the cheese is nice and bubbly. Carefully remove from the oven, and get ready.
Thanksgiving Is Right Around The Corner.

Standard

I love this time of year! Especially the food! Don’t get me wrong I love BBQ in the summer, but I truly enjoy all the food that gets cooked up at this time of year. Growing up we always had stuffing (blah) I never ate it lol I just didn’t like it. When I moved to the south I finally got to taste dressing now I love it I could eat it all through out the year lol. So I decided to post one of my favorite dressing recipes!


Ingredients

  • 1 (16 ounce) package dry corn bread mix
  • 2 tablespoons butter
  • 1/2 cup chopped celery
  • 1 small onion
  • 2 eggs, beaten
  • 2 cups chicken stock
  • 1lb chicken
  • salt and pepper to taste

Directions

  1. Prepare the dry corn bread mix according to package directions. Cool and crumble.
  2. Preheat oven to 350 degrees F (175 degrees C). Grease one 9×13 inch baking dish.
  3. In a large skillet over medium heat, melt the butter and saute the celery and onion until soft.
  4. In a large bowl, combine the celery, onions, 3 cups crumbled corn bread, eggs, chicken stock, sage and salt and pepper to taste; mix well.
  5. Boil Chicken in pot remove and shred chicken season to taste add the chicken to the mix
  6. Place into prepared dish and bake at 350 degrees F (175 degrees C) for 30 minutes.


So Cute Pumpkin Ideas

Standard

After laying in the bed sick for the last few days I decided that today would be the day that I got up and did something crafty! Of course with Halloween  right around the corner and thanksgiving following right behind I figured I’d look for something that would accommodate both occasions. I found these super cute pumpkins on Midwest Living 

ss_100010094
Instructions:
Set leaves between paper towels and flatten them under a book for at least five days. Then brush decoupage glue on a white pumpkin. Arrange the leaves on the pumpkin’s surface. Cut small slits along the edges of the leaves as you go, so they’ll fit the pumpkin’s contours. To finish, coat the decorated surface in decoupage glue.

Simple Pumpkin Pie (My Fav!)

Standard
Easy Pumpkin Pie

Pillsbury

Prep Time:5 minutes


Total Time:3 hours 10 minutes

Servings:8 servings

Ingredients

  • 3/4  cup sugar
  • 1 1/2  teaspoons pumpkin pie spice
  • 1/2  teaspoon salt
  • 1  can (15 oz) pumpkin (not pumpkin pie mix)
  • 1 1/4  cups evaporated milk or half and half
  • 2  eggs, beaten
  • 1  Pillsbury® Pet-Ritz® frozen deep-dish pie crust

Directions

  1. 1Heat oven to 425°F. In large bowl, mix filling ingredients. Pour into pie crust.
  2. 2Bake 15 minutes. Reduce oven temperature to 350°F; bake 40 to 50 minutes longer or until knife inserted near center comes out clean. Cool 2 hours. Serve or refrigerate until serving time. Store in refrigerator.
Thanks Pillsbury.

Deeelish and super easy!

Standard

Cinnamon toast crunch bars!

Cinnamon Toast Crunch Bars 
  • Prep Time: 5 min
  • Total Time: 10 min
  • Serving Size: 16 bars

Ingredients

  • 1/4 cup butter
  • 4 cups miniature marshmallows
  • 4 1/2 cups Cinnamon Toast cereal

Directions

  1. 1Spray an 11X17 or 9X9 pan with cooking spray.
  2. 2In a large pot melt better over low heat. Add marshmallows and cook over medium-low heat until marshmallows are completely melted.
  3. 3Once marshmallows are melted, remove pot from heat and add cereal to the pot, stirring to coat.
  4. 4Press into prepared pan and cool. Cut into bars and serve.
Thanks Tablespoon.

Yummy Bagel Pizza!

Standard


BAGEL PIZZA
Ingredients: 

   •1 bagel, split open 
   •2 to 4 teaspoons bottled pizza or spaghetti sauce 
   •2 to 3 tablespoons grated mozzarella cheese 
1. Spread 1 to 2 teaspoons of sauce on each bagel half. Sprinkle with grated cheese. 
2. Microwave, bake or broil until cheese is melted. 
3. Add other items before cheese as desired…


Doughnut Hole Acorns

Standard

Yum I found this super cute and sure to be tasty recipe for Doughnut Hole Acorns! 


Ingredients

  • Chocolate Frosting or Peanut Butter
  • Donuts
  • Crumbled Toffee
  • Pretzel 
Instructions

  1. Frost a third or so of a plain or glazed doughnut hole with chocolate frosting or peanut butter.
  2. Roll the frosted top in crumbled toffee (look for it in the baking section of grocery stores), then add a small piece of a pretzel for the stem.
Thanks Family Fun! 


Halloween Yarn Ball Wreath

Standard

Sooo cute! Strangely enough this is my first time seeing these :\ Lol. I love this I’m sooo glad I stumbled across this.

Yarn balls are super easy, you don’t even need glue! Grab a bunch of Styrofoam balls of all sizes… yarn in 3 colors that you adore and start wrapping. No glue needed! Just tuck in the end piece when you’re done! You will need loads about 30

A (wire) wreath-form anchors the lovely BOB! (That’s bunch of balls!)

A glue gun that is high heat and high heat glue sticks are your other tools…turn the wreath form so it looks like a bowl and start laying out the first layer…

After the first layer is glued on turn the wreath over and go over each ball with more glue.

build on that first layer…you can get carried away!


I found these on write it down and on all things heart and home 😛


Super Cute Acorn Picture Frame

Standard

Surfing the web I also found this super easy super cute picture frame. This would be a great project to work on with your child or grandchild, niece or nephew.


What you’ll need:

  • Acorn tops, enough to cover your frame, we used 59
  • White craft glue
  • Wooden frame

How to make it:

  1. Gather acorn tops that have fallen from the trees. Place acorn tops in a bowl of water to soak. Use a toothbrush and a little baking soda to clean them off if you wish. Rinse, drain, and pat dry with a towel.
  2. Place the acorn tops on a cookie sheet and have an adult bake them in a preheated 225 degree F oven for about 40 minutes. This should kill any remaining insects that may be hiding and will also dry the acorn tops. Remove from oven and let cool on a paper plate in a single layer. 
  3. Apple a generous amount of glue to one section of the frame at a time. Cover with acorn tops, hanging the ends of the acorns over the edges of the frame if needed to fit.
  4. Once the frame is completely covered, fill in all the gaps between the acorns with craft glue. Let dry overnight. 

Tips:

  1. If you want a more colorful frame, paint the acorns.
  2. To jazz up your frame, add a bow to a painted frame or use jute, twine or raffia to add a bow to a natural frame.
  3. When collecting acorn tops, be sure to gather extras to save for additional projects!